
Picture day makeup is a little different from your everyday makeup. You want your skin to look fresh, your eyes to stand out, and your features to have enough definition to show up beautifully in a photo—but you don’t want to look overly heavy or completely different from yourself.
The camera can flatten dimension, emphasize texture, and make some makeup disappear. Flash can also make certain products look lighter or create unwanted shine. That’s why the best picture day makeup focuses on skin preparation, lightweight layers, balanced coverage, soft definition, and a natural-looking finish.
Whether you have oily, dry, combination, sensitive, or normal skin, you can adjust the routine to make it work for you.
Here’s exactly how to create a soft, polished, camera-ready makeup look from skincare to the final setting spray.
Start With Your Skin Type
Before picking up your foundation, figure out what your skin actually needs. The same makeup routine won’t work equally well for everyone.
If You Have Oily Skin
Oily skin can become extra shiny under bright school-photo lighting.
Focus on:
- Lightweight, oil-free moisturizer
- Mattifying or pore-blurring primer around the T-zone
- Thin layers of long-wearing foundation
- Powder mainly around the forehead, nose, and chin
- A setting spray designed for longer wear
Don’t cover your entire face in heavy powder. Too much powder can make the skin look flat and emphasize texture.
If You Have Dry Skin
Dry skin usually looks best with hydration and thinner makeup layers.
Before makeup:
- Apply a gentle moisturizer.
- Give your skincare a few minutes to absorb.
- Use a hydrating primer if your skin needs extra moisture.
- Choose a natural or satin-finish foundation.
- Avoid excessive powder.
If your skin becomes flaky around the nose or cheeks, don’t try to hide it with more foundation. Extra product can actually make the flakes more noticeable.
If You Have Combination Skin
Combination skin needs a little strategy.
Use hydrating products on drier areas and a more mattifying primer around your forehead, nose, and chin.
You can also use powder only where you tend to become shiny rather than applying it everywhere.
If You Have Sensitive Skin
Keep the routine simple.
Avoid introducing a completely new skincare product right before picture day. Stick with products your skin already tolerates.
Choose gentle, fragrance-free options when possible, and patch-test anything new ahead of time.
If You Have Normal Skin
You have the most flexibility. A lightweight moisturizer followed by a natural-finish primer and foundation can create a beautiful base.
The goal is still to avoid applying too many layers.
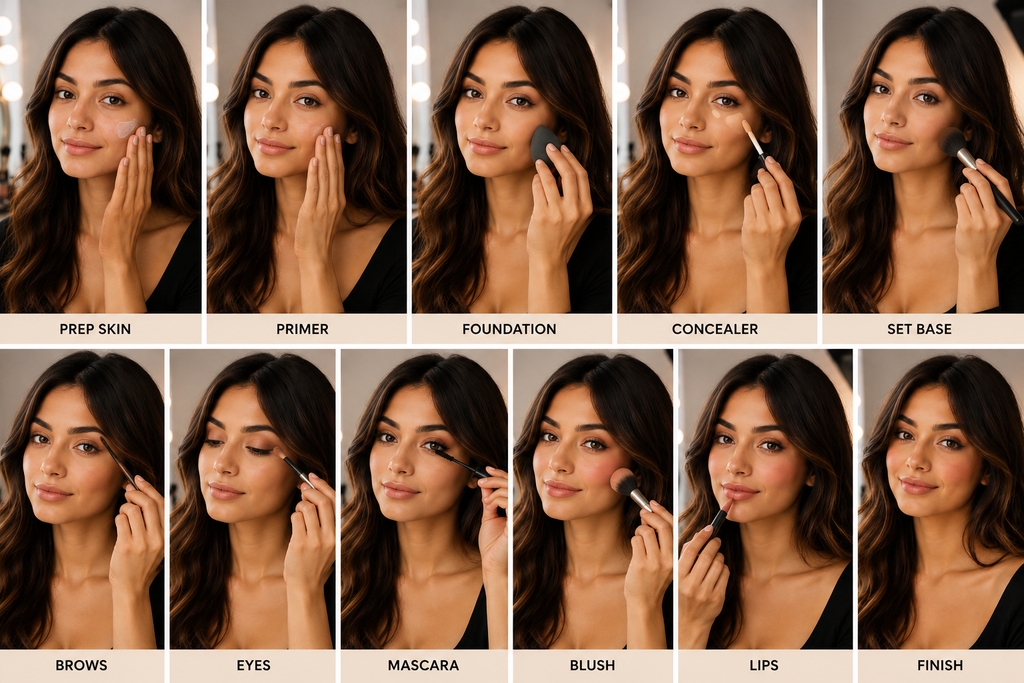
Step 1: Prep Your Skin Properly
Great picture day makeup starts before foundation.
Cleanse your face with a gentle cleanser and apply your usual moisturizer. If you’re doing your makeup during the day, apply sunscreen that you already know works well for your skin.
Give skincare time to settle before applying makeup.
Don’t aggressively scrub your face right before picture day. It can cause redness and irritation.
If you normally use lip balm, apply it while you’re doing the rest of your makeup so your lips are soft when you reach the lipstick step.
Why Skin Prep Matters
Foundation sits much better on properly hydrated skin. When your skin is excessively dry, makeup can cling to flaky areas. When you are overly oily, makeup can slide or separate.
Think of skincare as creating a smooth canvas rather than trying to fix everything with foundation.
Step 2: Use Primer Where You Actually Need It
You don’t necessarily need the same primer all over your face.
If your T-zone gets oily, apply a small amount of mattifying primer around the nose, forehead, and chin.
If your cheeks are dry, use a hydrating primer there instead.
For visible pores, gently press a smoothing primer into the areas rather than aggressively rubbing it around.
Pro tip: Give primer a minute or two to settle before applying foundation. Layering too quickly can cause products to move around.
Step 3: Create a Natural-Looking Base
For picture day, foundation should even out your complexion rather than completely erase your skin.
Choose a foundation that matches your face and neck, not just your hand.
Apply a small amount to the center of your face and blend outward.
A damp makeup sponge can give you a soft, natural finish, while a foundation brush can provide more coverage.
The important part is using thin layers.
Start with one layer and only add more where you actually need it.
Don’t Forget Your Neck
If your face is noticeably lighter or darker than your neck, the difference can become obvious in photographs.
Blend foundation carefully around your jawline and slightly onto the neck if necessary.
Step 4: Conceal Strategically
You don’t need a thick layer of concealer under your eyes.
Apply a small amount to the inner corner and any area where you genuinely want additional coverage.
For blemishes, use a small brush and gently tap concealer directly onto the spot.
Don’t repeatedly swipe over the area because you can remove the foundation underneath.
For Under-Eyes
If you have dark circles, use a small amount of concealer with a natural finish.
Avoid piling on product because heavy concealer can settle into fine lines and become more noticeable in photographs.
A tiny amount can make a surprisingly big difference.
Step 5: Add Soft, Natural Contour
Camera lighting can flatten your facial features, so a little definition helps.
Use a matte or softly satin contour shade that isn’t dramatically darker than your skin.
Apply it lightly:
- Under the cheekbones
- Along the sides of the nose if desired
- Around the outer forehead
- Beneath the jawline
Blend everything thoroughly.
The goal isn’t to create sharp Instagram-style contour. You want your face to have natural-looking dimension.
Choose Your Contour Based on Your Skin Tone
Fair skin: Try soft taupe or neutral beige-brown shades.
Light-medium skin: Soft neutral or golden browns can work well.
Medium skin: Warm caramel or neutral brown shades can add definition.
Deep skin: Rich chocolate, espresso, or warm deep-brown shades can create beautiful dimension.
Avoid choosing a contour simply because it looks dark in the pan. The right shade should blend naturally into your complexion.
Step 6: Blush Is Your Best Friend
Blush is especially important for picture day because cameras can make the face look flatter and less colorful.
Apply blush slightly higher on the cheeks and blend toward the temples.
Cream blush can create a fresh finish, while powder blush can provide longer wear.
For a natural look, start with a small amount and build gradually.
Blush Shades by Skin Tone
Fair skin: Soft pink, baby pink, peach, or light rose.
Light-medium skin: Peach, warm pink, coral, and rose.
Medium skin: Terracotta, warm rose, coral, and rich peach.
Deep skin: Berry, wine, deep coral, burnt orange, and rich plum.
Don’t automatically choose the brightest blush. A shade that complements your undertone will usually photograph more naturally.
Step 7: Add a Little Highlight—Not a Lot
Highlighter can look gorgeous in photographs when used carefully.
Place a small amount on:
- The tops of the cheekbones
- The bridge of the nose
- The inner corners of the eyes
- A tiny amount above the cupid’s bow
Avoid putting a very glittery highlighter all over your face.
For picture day, a fine pearl or satin finish usually looks more natural than chunky shimmer.
Step 8: Do Your Brows Before Eye Makeup
Well-shaped brows frame your face and help your eyes stand out.
Brush your brows upward with a spoolie.
Then lightly fill sparse areas with a brow pencil, powder, or fine-tip product.
Don’t completely redraw your brows into a dramatically different shape.
Use short, hair-like strokes and blend the product with a spoolie.
Set them with clear or tinted brow gel if you normally use one.
Brow Tip for Photos
Brows that are too dark can look much heavier in photographs than they do in the mirror.
When in doubt, choose a softer shade and build gradually.
Step 9: Create Soft Picture-Day Eyeshadow
You don’t need an elaborate eyeshadow look.
A simple combination of neutral shades usually photographs beautifully.
Easy Eyeshadow Combination
Start with a light beige or cream shade over the lid.
Apply a soft medium-brown shade into the crease.
Blend the edges until there are no harsh lines.
Add a slightly lighter shade to the center of the lid if you want extra dimension.
Finish with a tiny amount of shimmer at the inner corner.
For a more defined look, use a slightly deeper brown on the outer corner.
Choose Eyeshadow Based on Your Eye Color
Brown eyes: Bronze, champagne, warm brown, plum, and soft gold.
Blue eyes: Champagne, taupe, warm brown, peach, and copper.
Green eyes: Soft brown, mauve, plum, rose, and bronze.
Hazel eyes: Gold, bronze, olive, brown, and warm champagne.
You don’t have to follow these rules. The most important thing is choosing shades that make you feel comfortable.
Step 10: Make Your Eyes Look More Defined
Eyeliner can easily become too heavy for a school photo.
Instead of drawing a thick black line across the entire lid, try a thin brown or dark-brown line close to the lash line.
You can slightly extend the outer corner for a subtle lifted effect.
If you love black eyeliner, keep the line thin and make sure it is blended.
For Smaller or Hooded Eyes
Keep the eyeliner thin and focus definition toward the outer third of the eye.
Avoid taking a thick line too far across the lid because it can visually reduce the space around your eyes.
Step 11: Curl Your Lashes
Never underestimate an eyelash curler.
Curl your lashes gently at the base, middle, and tips rather than squeezing extremely hard in one spot.
Then apply mascara from the roots upward.
A lengthening or defining mascara can make your eyes look more awake in photos.
If you wear false lashes, choose a lightweight natural style rather than extremely dramatic lashes.
The goal is for your eyes to look defined—not hidden behind lashes.
Step 12: Choose the Right Lip Makeup
Picture day lips usually look best with a shade that enhances your natural coloring.
Start with lip balm, then gently remove excess before applying color.
You can outline the lips with a lip liner close to your natural lip color and fill them in.
Then apply lipstick or a tinted lip product.
Lip Shades by Skin Tone
Fair skin: Pink nude, peach, soft rose, and mauve.
Light-medium skin: Dusty rose, caramel nude, peachy pink, and warm mauve.
Medium skin: Rose brown, terracotta, cinnamon, and warm nude.
Deep skin: Berry, cocoa, deep rose, brick, and plum.
For a softer look, tap lipstick onto your lips with your fingertip rather than applying a thick layer directly from the tube.
Step 13: Set Your Makeup Without Making It Heavy
This step is especially important if your school picture involves bright lighting or a long day.
If you have oily skin, lightly powder the areas that tend to become shiny.
If you have dry skin, avoid covering your entire face with powder.
Then use a setting spray that works with your normal makeup routine.
Hold the spray at an appropriate distance and allow it to dry naturally.
What About Flashback?
Some products can reflect light in photographs, particularly when used heavily.
If you know your photo will involve flash, don’t experiment with a completely unfamiliar complexion product that morning.
Use makeup you’ve tested before whenever possible.
Step 14: Check Your Makeup in Natural Light
Before leaving for picture day, look at your makeup near a window or in natural daylight.
Check:
- Is the foundation blended into the neck?
- Is concealer creasing?
- Is your blush visible but not overpowering?
- Are your brows too dark?
- Is your eyeliner even?
- Is your lipstick sitting smoothly?
- Is your T-zone too shiny?
A quick check can catch things that bathroom lighting may hide.
Picture Day Makeup for Different Skin Types
Here’s a simple way to adjust the entire routine.
| Skin Type | Best Approach |
|---|---|
| Oily | Lightweight base, mattifying primer, strategic powder |
| Dry | Hydrating skincare, natural-finish foundation, minimal powder |
| Combination | Mattify T-zone and hydrate dry areas |
| Normal | Balanced moisturizer and natural-finish base |
| Sensitive | Familiar, gentle products and minimal experimentation |
Remember that skin type can change with weather, hormones, skincare, and other factors. Focus on how your skin behaves on the day rather than forcing yourself into one category.
Picture Day Makeup Mistakes to Avoid
Using Too Much Foundation
More foundation doesn’t automatically mean better photos. Heavy layers can make texture more visible.
Trying a New Skincare Product That Morning
Even a product that works well for someone else can irritate your skin.
Over-Powdering
Too much powder can make your complexion look dry and flat.
Making Your Brows Too Dark
Dark, blocky brows can become one of the strongest features in a photograph.
Forgetting Blush
Foundation can remove some natural color from your face. Blush helps bring dimension back.
Going Too Heavy With Highlighter
Strong glitter can reflect light in ways you don’t expect.
Ignoring Your Neck
A noticeable foundation line can show up clearly in photographs.
Wearing a Completely Different Makeup Style
Picture day is usually not the best time to experiment with a dramatic new look. You want to look like yourself—just a polished, camera-ready version.
A Simple Picture Day Makeup Routine
If you don’t have much time, follow this streamlined routine:
Prep: Cleanse, moisturize, and apply your usual sunscreen.
Base: Apply primer where needed, followed by a thin layer of foundation.
Conceal: Cover under-eyes and blemishes selectively.
Dimension: Add soft contour or bronzer and a flattering blush.
Brows: Brush, lightly fill, and set.
Eyes: Use a neutral eyeshadow, thin liner, and mascara.
Lips: Apply lip liner and a natural-looking lipstick or gloss.
Set: Powder only where needed and finish with setting spray.
Check: Look at your face in natural light before leaving.
What to Keep in Your Bag
If you’re going straight from picture day to school or another activity, a tiny touch-up kit can be helpful.
Keep:
- Lip product
- Small powder or blotting papers
- Mini mirror
- Tissues
- Cotton swabs
If your skin gets oily, blotting papers can remove excess shine without piling more powder onto your face.
Final Thoughts
The best picture day makeup isn’t about wearing the most makeup. It’s about creating enough definition for your features to show beautifully while keeping your skin looking like skin.
Start with skincare that works for your skin type, use thin complexion layers, add soft contour and blush, define your brows and eyes, and choose a lip color that complements your natural coloring.
Most importantly, don’t completely change your appearance just for a photograph. The goal is to look like you—just fresh, polished, confident, and camera-ready.
A little preparation can make a huge difference, so practice the look before picture day if you’re trying something new. That way, you’ll already know how your makeup looks in natural light and how it wears throughout the day.
FAQs
What makeup is best for picture day?
A lightweight, natural-looking base with soft blush, defined brows, neutral eyeshadow, mascara, and a flattering lip color usually photographs beautifully.
Should I wear foundation for picture day?
You can, especially if you want to even out your complexion. Choose a foundation that matches your skin and neck and apply it in thin layers.
How do I prevent oily skin from looking shiny in pictures?
Use a lightweight mattifying primer on oily areas and lightly powder the T-zone. Blotting papers can also help remove excess shine without adding more product.
What is the best picture day makeup for dry skin?
Focus on hydration before makeup and choose a natural or satin-finish complexion product. Use minimal powder and avoid layering too much product over dry areas.
Should I wear eyeliner for picture day?
Yes, if you normally like eyeliner. A thin brown or black line close to the lash line can define your eyes without looking overly dramatic.
How can I make my eyes stand out in pictures?
Curl your lashes, apply mascara, define your brows, and use softly blended eyeshadow. A small amount of light eyeshadow in the inner corners can also make the eyes appear more awake.
What lipstick should I wear for school pictures?
Choose a shade that is close to or slightly richer than your natural lip color. Soft pink, rose, nude, mauve, brown-rose, and berry shades can all work beautifully depending on your complexion.
Should I use highlighter for picture day?
You can, but keep it subtle. A fine satin or pearl finish on the high points of the face generally looks more natural than heavy glitter.